DPD Update: Authorize + Capture flow to prevent double charges, New Extra Sale Notice integration

  • Jason@DPD
  • August 25, 2014
  • 1 Comment

Today we released an update that changes the way we charge credit card transactions to prevent double submits of payment information resulting in double charges.

Authorize + Capture Flow for Credit Card Transactions

This change is somewhat technical and should be invisible to buyers but will address an important support issue affecting credit card users.

DPD has always used javascript to prevent double submits of the payment form in the DPD cart. However, recently there have been more and more timeouts when submitting charges to mainly Paypal Payments Pro where their site would fail to load (outside of DPD’s control), the buyer would give up and reload the page defeating any javascript we could do, and submit a duplicate charge.

The change released today now splits Authorize (to see if the funds are available) and capture (to actually charge the card) in to two separate transactions. This lets us double-check to see if there is more than one capture being sent for a transaction and cancel any duplicates before they are charged.

The end result should be no more double charges for customers even if the payment processor (PayPal, Stripe, Authorize.net, etc.) time out.

Extra Sale Notification Email Integration

Another often requested feature, We’ve added an integration that lets you send an extra sale notice email to anyone you choose on a per-store basis. This email is the exact email that the account owner gets if they select the “Send sale notice emails” option in their profile.

This is a per-store setting and you can add as many extra sale notice emails as you like.

DPD Update: Use your own S3 File Fulfillment, UI Updates, Bug Fixes

  • Jason@DPD
  • August 13, 2014
  • No Comments

Today we released a new purchase action that allows you to deliver a file from your own S3 bucket. This is an often requested feature for advanced users only.

This is an advanced feature that will cost you money.

Have no illusions about this feature–

Its complicated to set up, requires that you generate and enter your AWS credentials and file URLs, and will cost you money in addition to your DPD monthly fee. This is only for advanced users only.

You are responsible for all storage and bandwidth/delivery fees incurred through Amazon S3 for files delivered from your S3 account.

The vast majority of users will use DPD’s built in file storage and delivery by using a simple “Deliver File..” action. This uses the storage space included with your DPD plan and does not charge any additional fees for storage or bandwidth. With a deliver file action all you need to do is upload a file to DPD and that is it.

Other changes in this update:

  • Updated the UI on DPD Admin list views (purchase actions, payment processors, shipping, etc.)
  • Tweaked the way we handle duplicate PayPal IPNs to prevent transaction errors.
  • Fixed an issue where empty 3rd party conversion tracking integrations would cause checkout failure
  • Removed a restriction that would cause hard coded “continue shopping” URLs in the button code to not work as expected
  • Updated UPS integration to assume all addresses are residential
  • Required javascript enabled to complete checkout where tax is collected, eliminating a way to avoid taxes.
  • Added new graphics and logos throughout the DPD admin
  • Removed unused legacy admin plugins to improve performance

DPD Update: Per-Product Affiliate Hoplinks, admin and theme tweaks

  • Jason@DPD
  • July 15, 2014
  • No Comments

In this update we made an improvement to the DPD affiliate system as well as added a couple features to the admin that vendors have been requesting.

Per-Product Affiliate Links

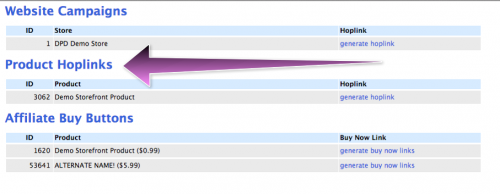
You can now enter a product URL on Product -> Edit and we’ll provide a per-product hoplink to your affiliates that leads to that URL in their affiliate control panel.

To give your affiliates per-product hoplinks:

1. Log in to DPD
2. Go to Products in the left menu to open your product list
3. Edit the product you want to add a product URL to
4. Enter the product’s full URL in the field provided and save.

hoplink URL

Your affiliates will see, below the website hoplinks, any product specific hoplinks you have configured:

product_hoplinks

A Word about the affiliate system in DPD

We know that there are many features that need to be added to the affiliate system in DPD to make it a robust, full featured system.

The affiliate system is the oldest code in DPD, written back in the days before stores or even the cart existed.

We are working on an entirely new, full featured affiliate platform to replace the current one. This feature was added into the existing system because it was causing a major headache for many vendors, but our primary focus is the new system that will replace the current one. This is why there are not many affiliate updates at this time- we’re focusing our resources on the new and improved system.

Please, bear with us while we work on this huge improvement to DPD

Other Changes in this Update:

  • Added a Coupon Name filter to the Purchase list
  • Updated the coupon report to use the new coupon name filter as well as the coupon code filter for doing lookups
  • Added a language template global you can use in all cart text areas
  • Made purchase reactivation use the customer record email, not the purchase record
  • Fixed the sort on import from FTP list in file fulfillments to use name sort order
  • A few stability and performance tweaks related to our new hardware migration / platform improvements

Maintenance Completed

  • Jason@DPD
  • June 29, 2014
  • 1 Comment

We have completed our maintenance event and upgraded primary hardware.

We published a time of 2 hours to be on the safe side, but the total time this impacted access to the DPD site was just 36 minutes.

We generally only have a hardware event like this every other year or so to upgrade critical hardware and keep things current. All vendors should experience performance improvements throughout the DPD admin.

PLANNED MAINTENANCE NOTICE – Jun 29 @ 10:00PM EDT (2:00AM GMT)

  • Jason@DPD
  • June 24, 2014
  • No Comments

Sunday Jun 29, 10:00 PM EDT / 2:00 AM GMT.

Starting at 10:00 PM EDT (2:00AM GST) on Sunday, June 29th we will be performing a critical infrastructure upgrade to DPD servers. This upgrade, which will involve moving a critical database and web server, will result in up to 2 hours (hopefully less!) of downtime for some or all vendors during the move.

See what time 10:00 EDT is in your time zone

10:00PM EDT is historically our lowest traffic time across the entire platform so this upgrade will impact the minimum of customers.

Vendors can expect the DPD admin, their shopping carts, and products to be unavailable during some or all of this time. We will have all staff on hand during this upgrade and we will complete it as quickly as possible.

We apologize for the inconvenience this will cause, but this critical upgrade must be made to keep the service reliable for all vendors and customers.

New Google Analytics: Universal Analytics Integration

  • Jason@DPD
  • June 10, 2014
  • No Comments

google-universal-analytics

Today we released a completely new Google Analytics: Universal Analytics integration for all-in-one tracking of your entire sales process and checkout flow with DPD.

The new integration replaces the old Google Analytics eCommerce integration and manually placing code in the Tracking HTML field of your store preferences.

The old Analytics Ecommerce integration should be disabled and all Analytics tracking code removed from the Tracking HTML field under store Preferences for accurate tracking results.

The new Universal Analytics integration is available for all v2 stores in DPD under the Integrations menu.

Note: Uses Universal Analytics

This integration uses Universal Analytics using analytics.js, not the old “classic” analytics javascript. The new Universal Analytics updates faster, tracks better, and loads faster on your website.

If you are using Classic analytics code on your website you must update your tracking code to use this new integration. New code is provided by the integration for use on your website.

The New Universal Analytics Integration Will:

1. Place the appropriate tracking code on each page of your cart and checkout.
2. Optionally display the eCommerce tracking fields on the delivery page once for accurate conversion tracking.
3. Allow you to accurately track referrals, traffic sources, and campaigns.
4. Allow you to accurately track and visualize your goal funnel.
5. Provide you with the necessary Universal Analytics tracking code for you to place on every page of your website to enable cross-domain linking and accurate tracking.

Complete instructions, including how to create goal tracking funnels and more, are in the Knowledgebase entry for Google Analytics: Universal Analytics Integration

Other minor updates / bug fixes in this release:

  • Fixed bug with cancel url to paypal integration
  • Pass through any hoplink params to the target url
  • Fixed support desk code when unauthenticated / passing of registered emails/usernames
  • Improved product caching for speed improvements and space management
  • Fixed validation on purchase refund form
  • Updated cart lightbox code to new responsive version

DPD Update: Coupon List Improvements and Future Plans

  • Jason@DPD
  • May 7, 2014
  • 4 Comments

Today we released an update to our coupon module that makes it easier to browse and manage coupons, especially when you have created many single use coupon or discount codes.

Coupon List Improvements

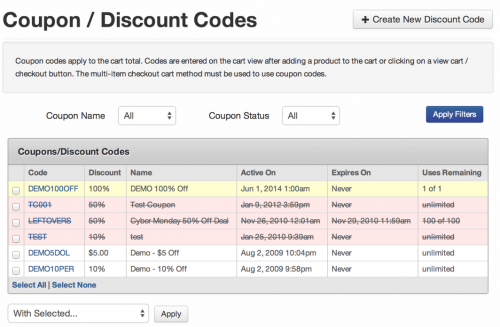
The coupon list now features a more compact table that lists more coupons at once and includes filters so you view specific coupon status, or a specific coupon name.

Coupon List Improvements

Color Coded Coupon Display

We have also color coded the coupon display to show inactive coupons as red and future coupons (which are not yet active but aren’t technically “inactive”) as yellow.

We hope being able to see at a glance the status of a coupon by its color will make it easier to understand what is going on with a specific code (and stop vendors from having to email us asking why their future coupon shows as “inactive” like an expired coupon).

Bulk Edit Coupon Status and Delete Coupons

In addition to the list and filter improvements, we have also added the ability to bulk edit the coupon status or bulk delete coupon codes. Simply check the box and use the menu at the bottom to select the action.

Coming Soon

This is a minor update but we’re not resting on our laurels- The entire DPD team is in the middle of a migration to move all DPD servers to Amazon Web Services. We’ve always used Amazon S3 for product backup, storage, and delivery, and now we’re moving everything else for greater scalability, speed improvements, and redundancy.

We will be making a dedicated post about the AWS migration and what it will mean for vendors soon.

DPD Update: Improved and Expanded Reporting

  • Jason@DPD
  • April 28, 2014
  • No Comments

This weekend we released an update to our Reports module that adds several new report formats and greatly expands DPD’s sales reporting capabilities. All reports can be exported to CSV for offline manipulation in Excel, your own accounting program, etc.

You can access these reports using the Reports link in the left menu, then selecting which report you would like to view from the list.

new reports

In addition to the Purchases and Customer lists that are filterable, we have now added the following table-based reports:

Sales Report

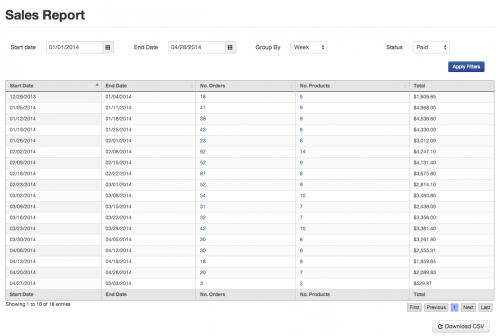
The new sales report lets you generate a table showing your sales between specific date ranges, grouped by date, week, or month. You can also show specific order statuses, so you could generate a refund report, etc.

Using the cross-linked columns you can drill down for each item to view the purchases for the time period or the products that were purchased in that time period using the products purchased report, described below.

Products Purchased Report

You can show all items that were sold within a specific date range with this report. You can also limit it to specific order status such as “only refunded” like the Sales Report.

From the products report you can go directly to the product in question as well as drill down to the purchase list for orders that only contained that product in the given report range.

Coupon Usage Report

The coupon usage report shows your coupon usage in a specific date range (or all time). For each coupon code it will show the number of times used, the total discounts given for the coupon, and the total sales for transactions that used that coupon.

From the coupon usage report you can go directly to the coupon, or view all purchases that used that coupon in the given date range.

Tax Report

To help with sales tax and VAT reporting, the tax report shows all tax monies collected for a given period. The report gives each tax on its own line for a given period. For example, if you collect Sales Tax, GST, and PST tax doing a 30 day lookup will show 3 lines, one for each tax class.

Report Usage

Using the reports together yields powerful results. For example, you can do a Sales Report lookup to find your best week, then click on the products column for that month to move over to the same lookup on the Products Purchased report to see your most popular products. All the reports are designed to work together, letting you drill down to a specific purchase if need be.

Using DPD’s Multiple Price Point Feature

  • Jason@DPD
  • January 6, 2014
  • 6 Comments

One of the least known and understood features of DPD, multiple price points allow you to sell the same product for multiple prices.

How Multiple Price Points Work

There are a few basic rules with multiple price points:

  • All price points for a product deliver the same product, they just charge a different price
  • Anyone with the price point buy URL can purchase the product for that price
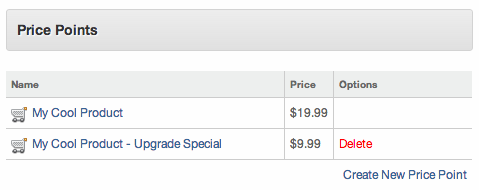
  • When you create a product in DPD, you set the “default” price. Alternate price points override the default price and can be higher or lower.
  • If an alternate price point is deleted, DPD will redirect any buyers who visit that price point URL to the default price of the product.
  • Alternate price points are not displayed on the cart index or anywhere else- they are effectively “hidden” prices.
  • You can selectively disable the affiliate system for any price point, so if you don’t want affiliates getting credit for discounted promotions you can do so.


In this article we’re going to go over a handful of sales scenarios using these rules and show you how you can use them to run your own promotions and sales variants of the same product, without using multiple product slots. Finally, we’ll show you how to create multiple price points quickly and easily for any product.

Selling discounted upgrades to previous buyers

In this scenario, lets say you sell a customer Version 1.0 of your product. Eventually, you come out with new and improved Version 2.0.

DPD allows you to export your customer list to CSV as well as automatically send buyers info to one of our supported 3rd party mailing list managers. You can easily create a new, discounted price point for your Version 2.0 product and send the discounted alternate price point buy link directly to your previous buyers while still offering Version 2.0 at the full retail price on your website.

Upgrade Special Price Point


Discounting an item to a mailing list

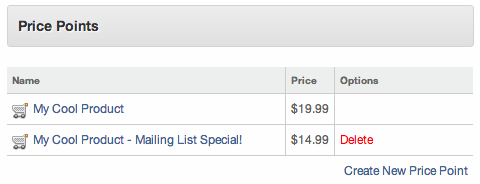
Similar to the scenario above, lets say you have a mailing list where you send special offers to your customers. You can offer your product for full price on your website using the default price while using the multiple price point feature to send a discounted price point to your mailing list to entice sales.

If you decide to make it a limited time promotion, you can later delete the alternate price point and anyone who follows the link in the email will get automatically redirected to the product’s default price.

Mailing List Special


Selling multiple license tiers for a product

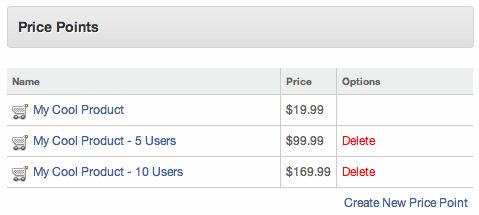
Many vendors who sell business and professional software and books offer multiple seat licensing to companies. For example, you might sell one license of your book for $19.99 or a 5-pack for $99.99.

Since no matter how many licenses they buy they’re still going to get one download of the product (having 5 download buttons for the same file would be silly) you can easily accommodate this sales setup using the multiple price point feature. You would just need to create your product with the default 1 license price, then create alternate price points for multi-license packs.

Multi-User Pricing


Limited time promotions without coupons

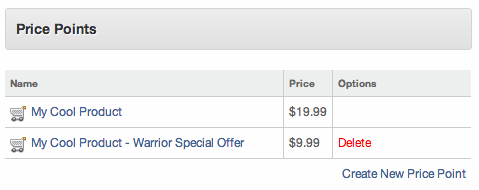
Popular with people who post on forums (especially “Warrior Forum” WSOs and other marketing related forums), limited time promotions without coupons are possible by using multiple price points. To achieve this, all you need to do is create your discounted price point and share the buy button or URL. When you’re ready to end the promotion on a set date or after a set number of sales, simply delete the discounted price point.

Anyone who follows the buy link to the now deleted discounted price point will be automatically redirected to the full, non-special retail price.

This is handy because it doesn’t require a coupon to use. And, unlike changing the default price of your product which will affect all buttons for that product everywhere, using an alternate price point allows you to share it with the specific marketing channels you choose while still offering full retail to the rest of the world.

Special Limited Time Offers


Selling different support levels for the same product

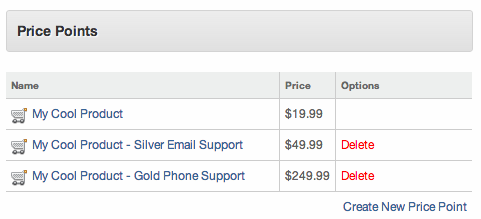
Similar to selling multiple license tiers, if you offer different support packages with the same downloadable product you can use multiple price points to offer those packages without using up multiple product slots.

Just create your product with it’s default, lowest level of support and then create a price point for your various support options. If you ever decide to stop offering a specific support option, anyone with the link will be automatically redirected to the default price.

Selling Different Support Options


How to Create Multiple Price Points

Creating a price point is easy:

1. Log in to DPD
2. Go to Products in the left menu to show the product list
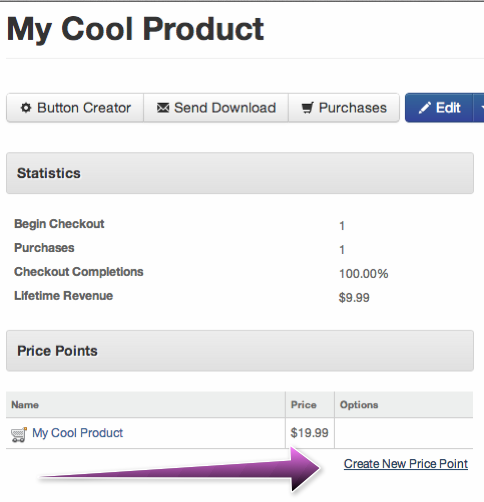
3. For the product you want to create an alternate price point for, click its details link
price-points-details

4. Scroll down to the Price Points section and select “Create New Price Point”
create-price-point

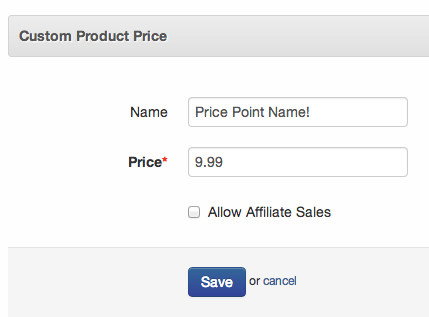
5. Enter your display name you want shown in the cart, if you want this product to be available for affiliate sales, and the price you want to charge, then save.
Screen Shot 2014-01-03 at 9.48.31 PM

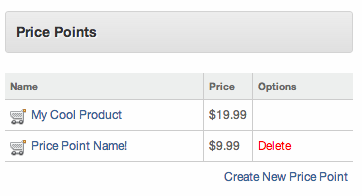
That’s it! Your new price point is created.
Screen Shot 2014-01-03 at 9.49.23 PM

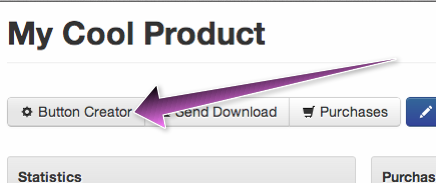
To deploy a link or button to your new price point, go to the button creator link for your product:
button-creator

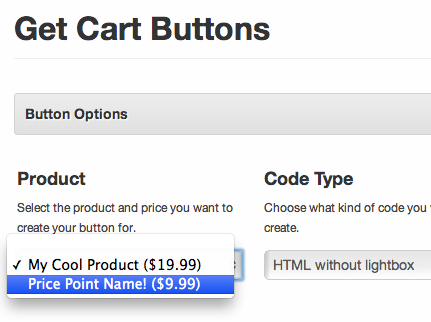
On the button creator page, your new price point will be listed along with your default price in the Product selection- just pick the price you want to create a button or link for and copy and paste the code as you normally would.
Screen Shot 2014-01-03 at 9.51.20 PM

That’s it! Remember- if you delete an alternate price point anyone who follows that link from an old post or email will automatically be redirected to the default price so you’ll never miss a potential sale. If you have any questions or comments about the multiple price point feature drop us a comment below or shoot us a support ticket- we’ll be happy to help!

Guide: Setting up and Selling A Pre-Order Product

  • Jason@DPD
  • January 2, 2014
  • 5 Comments

One of the most frequent questions we get at the helpdesk is how to set up and sell a preorder product. We specifically designed many DPD features, working in concert, with smooth and easy selling of pre-order products in mind. This in-depth guide will explain step-by-step how to create and run a pre-order sale.

There are 4 basic steps to selling a pre-order product:

1. Create the pre-order product in DPD before you have your product file
2. Sell the pre-order product on your website
3. Release your actual product on launch day
4. Send the actual product to the previous buyers of the pre-order.

This guide assumes you have a DPD account with a store already set up with a payment processor and ready to go. If you have not created a DPD account and completed the new store setup wizard to activate your first store, please do so before moving on.

Create The Pre-Order Product in DPD

The first thing you need to do is create a product in DPD for your pre-order. This product is like any other product in DPD, except instead of delivering the actual product file the customer is buying it will deliver a message thanking them for their pre-order.

1. Log in to DPD

2. Go to New Product in the left menu to begin creating your pre-order product
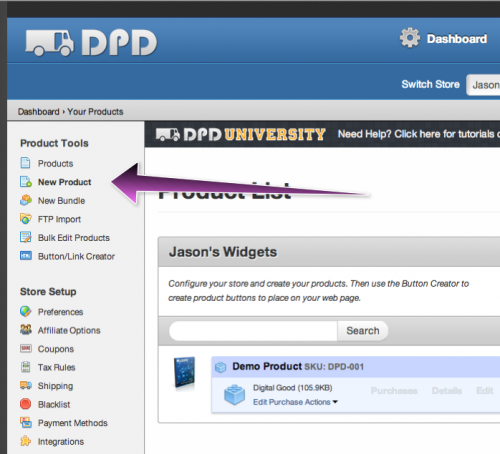
Create the Preorder Product Record

3. Select Digital Product as the type.
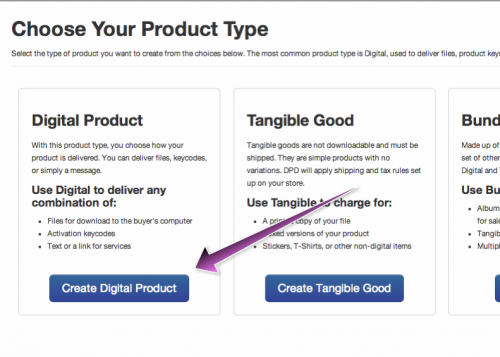
Select Digital Product type

4. Set the name, price, image, and short description how you would like it to display to pre-order buyers and save to go to Purchase Actions.
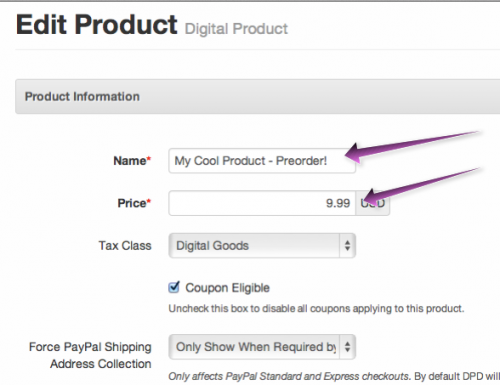
Define your preorder product

5. Purchase actions are where you define what DPD should do when a product is purchased. For most products, this is obviously where we would deliver a file or key. For this product, since the file is not ready yet, we’re going to set up a delivery message to be displayed to the pre-order buyer.

To do so, select “Add” beside the Delivery Message action.
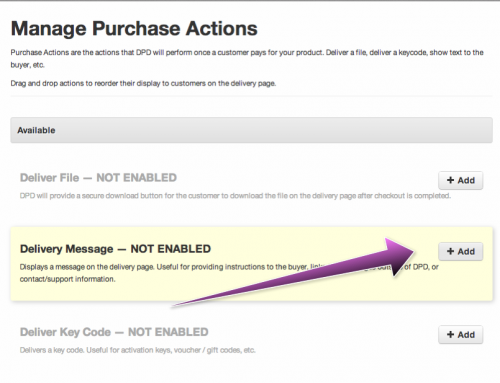
Add a delivery message

6. In the delivery message, add your own customer service message thanking them for buying, telling them when the product will be released, etc. This is completely up to you, but we recommend you give them a release date and let them know that a download link will be sent to the email they used to buy the product (either the email they enter during checkout or their PayPal email). Once you’ve crafted your message, save.
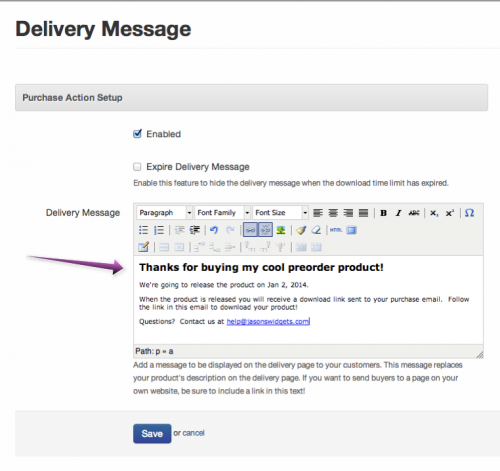
Don't forget to spellcheck!

7. Once your delivery message is configured and is green (green means go!) then click the finish product button to complete product setup.
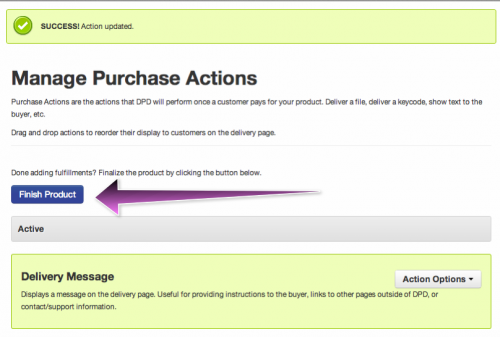
You're done!

You have now configured your pre-order product in DPD.

This product doesn’t do much for the buyer- it just takes their money and tells them thanks for buying- but it’s a vital step in accepting pre-orders since later we’re going to use this same product to update all the pre-order buyers.

Selling Your Pre-Order Product

Selling your pre-order product is just like any other product in DPD- you generate the button code and then copy and paste it to your website.

1. From the Products list, go to the Buttons link for your pre-order product.
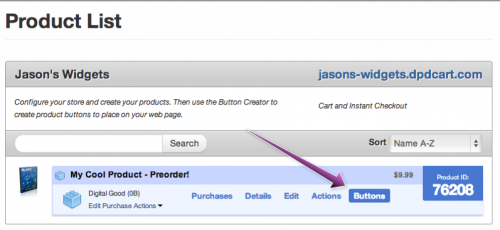
Create your button

2. Select your button graphic and copy and paste the code to your website.

Once you place the button code on your website customers will be able to add the pre-order product to their cart (or instant checkout) and purchase it.
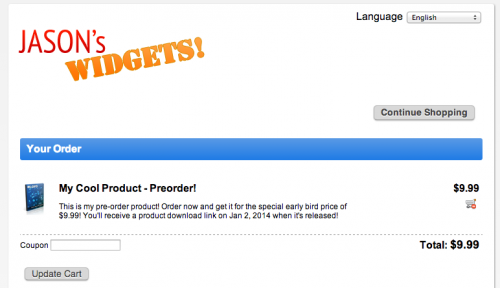
Preorder item in the cart

When the buyer completes their purchase, they’ll see the delivery message you configured during product setup thanking them for their order and telling them when they can expect their product to be delivered.
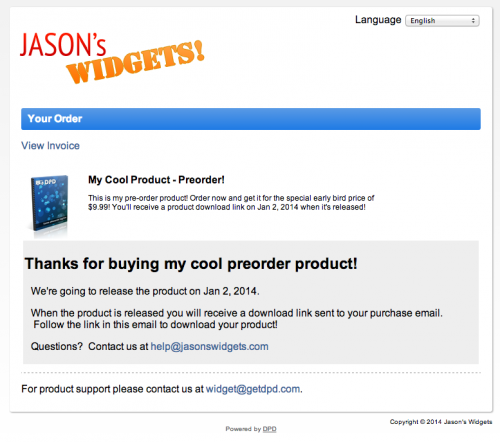
Preorder delivery page

Meanwhile, behind the scenes DPD is tracking who bought the pre-order product, which will be very important when you’re ready to send out the finished product.
DPD Purchase List

Launch Day! Adding Your Finished Product File

IMPORTANT! We’re not going to create a new product here- we’re going to edit the pre-order product we created before. This is important because we’re going to use this same product to send a product update to previous buyers to fulfill their pre-orders.

On launch day you need to do two things, the first of which is to update your pre-order product in DPD to be the full version of the product, including the actual finished product file people should receive when they buy the product.

1. From the product list, edit your product
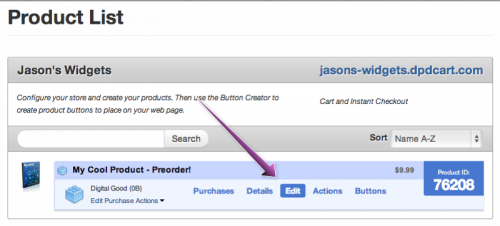
Edit your product

2. Edit your product name, price, and description to their regular, non-preorder values. This is what you want to display and sell the product for going forward now that the pre-order period is over.
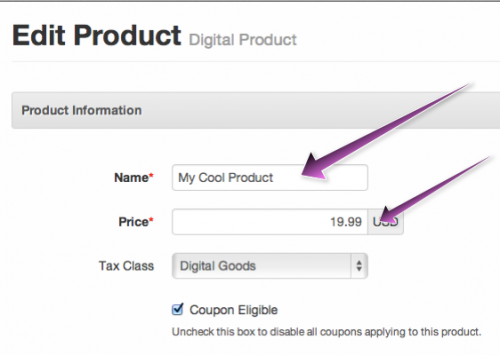
Update product to non-preorder values

3. Once we edit our product we’ll be returned to its details page. From here we’re going to Add/Edit Purchase Actions and replace our pre-order message with the actual product file.
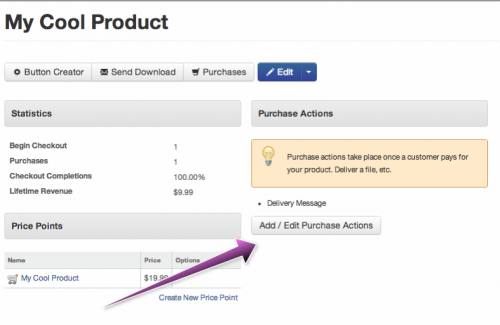
Change the preorder purchase actions

4. On the purchase actions page, we’re going to first delete the pre-order message by going to the menu for the deliver message action and selecting delete.
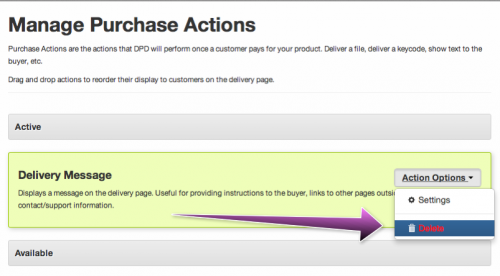
Delete the preorder message

5. Next, we’re going to add a Deliver File action so all future buyers will receive the product file. You can add as many product files as you like.
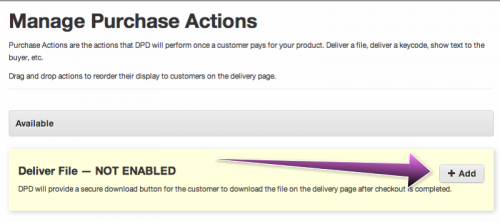
Add the actual product file

6. On the Deliver File setup page, upload your product file and configure any file specific options (PDF stamping, friendly name, etc.) that you like, then save.
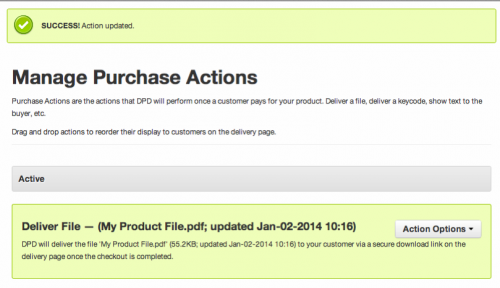
Ready to go

Your released version of your product is now active on your website!

Because we didn’t create a new product and simply edited the pre-order product there is no need to update the button code on your website. What was once a pre-order product that delivered a thank you message is now a full product that delivers the actual product file.

The same product appears as the full version product in the cart:
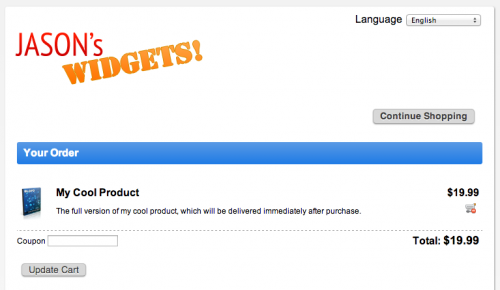
Full version in the cart

And when someone buys it they will get the product file you uploaded above instead of the pre-order thank you message.
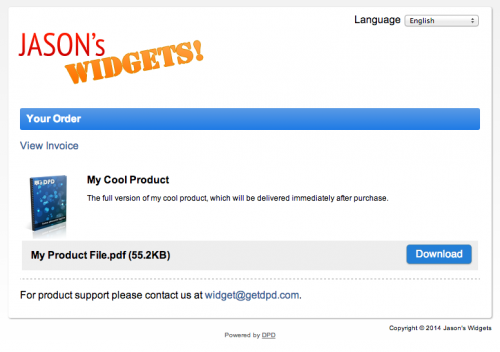
Full version after checkout with file

Last Step: Send Pre-Order Buyers the Released Product

The final step in the process is fulfilling all the pre-orders so those buyers can download the product file now that its released. To do that, we’re going to use DPD’s built in Send Product Update feature.

1. From the product list, click on the product’s Details link.
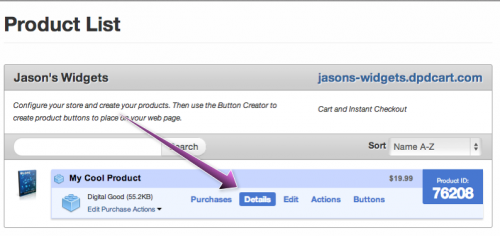
Product Details Link

2. On the product detail page scroll down and select “New Product Update Email” to begin the product update process.
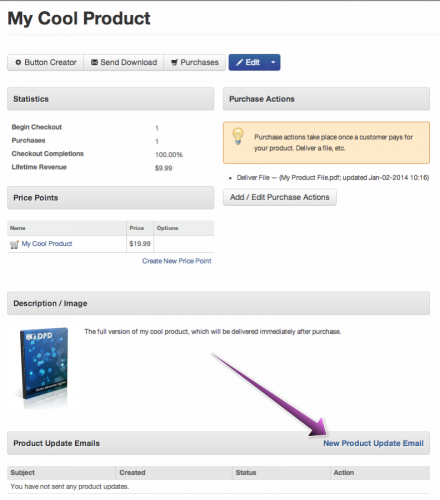
Send a product update

3. On the send product update page, customize your email subject and body to let the pre-order customers know that this is their download link and their wait is over.
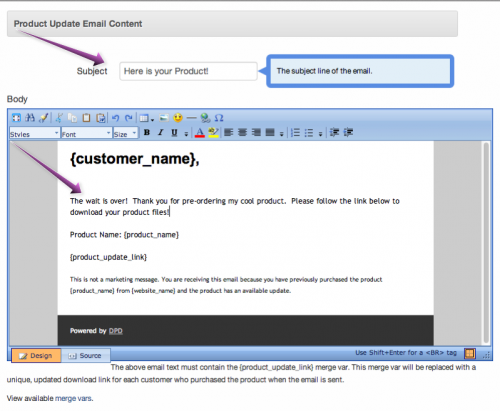
Create product update email

Note: Since in theory all buyers of the product before this date are pre-order customers, there is no need to manipulate the filters on the send product update page. Leaving the filters blank will send the updated file to all pre-order customers.

4. Preview the email and send. DPD will queue the product update email up for delivery and send it, usually within 20 minutes. Because of the potential for huge numbers of product update emails being sent at once, we queue these emails and send them in a metered fashion to prevent excessive load.

Your Pre-Order Buyers Now Have Their product!

When a product update is sent DPD re-evaluates the purchase actions that are assigned to the product. DPD will automatically see that the pre-order message has been removed and a file added, then update every pre-order customer’s purchase to reflect the new product file. This means that when they get their product update email and go to the download page they won’t see the pre-order message anymore; they’ll see the the download link instead!

All pre-order buyers will now receive your product update email with their own unique, activated download link to grab your product file.
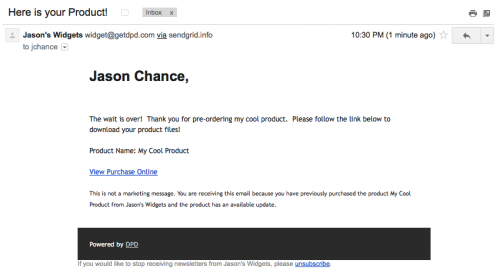
Pre-order fulfillment email

When they follow the download link in the email, they’ll be taken to their personal download page to grab the file you released:

Pre-order fulfillment download page

Selling a pre-order product has quite a few steps, but none of them are complicated and they follow a logical process once you understand how DPD allows you to update existing products and then send those updates out to buyers. We’re basically creating a dummy product, letting people buy it, and then giving them the actual product file once its released. By using the same product, we make sure that all pre-order buyers (as well as all future buyers going forward) get the product file and any future updates you may make to the same product.

If anyone has any questions or needs any clarification on the process please drop us a line in the comments below or send us a support ticket- we’ll be glad to help!